rolled paper chess set
October 17, 2010 § 44 Comments
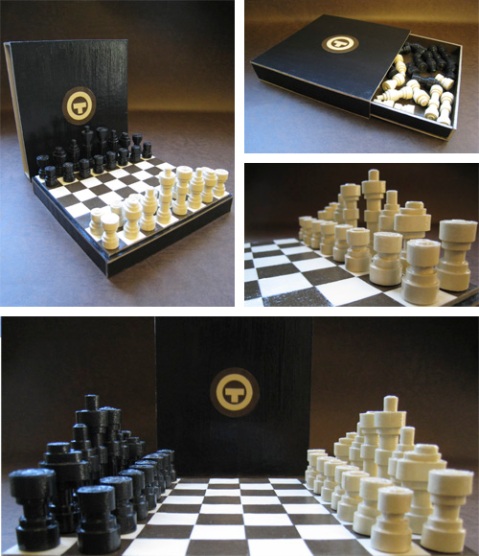
I am indisputably an advocate of handmade presents. In celebration of O.T.’s birthday, I decided to make him a travel-size chess set entirely out of paper. The chess pieces are crafted out of tightly rolled strips of black and cream paper. The box is millboard covered in paper (black for the exterior; white and brown for the board). The affixed monogram, too, is paper. The only exception to the rule is the Mod Podge which I used as a sealant and lacquer. Undoubtedly, this travel set will be exposed to much wear and tear, and perhaps some spills, so I wanted to be doubly sure it will endure. It took a fair bit of time in planning and more so in the execution. Each piece was carefully crafted with love for my love, who, dare I mention, was a chess champ at the age of 15. No one deserves this as much as he. 
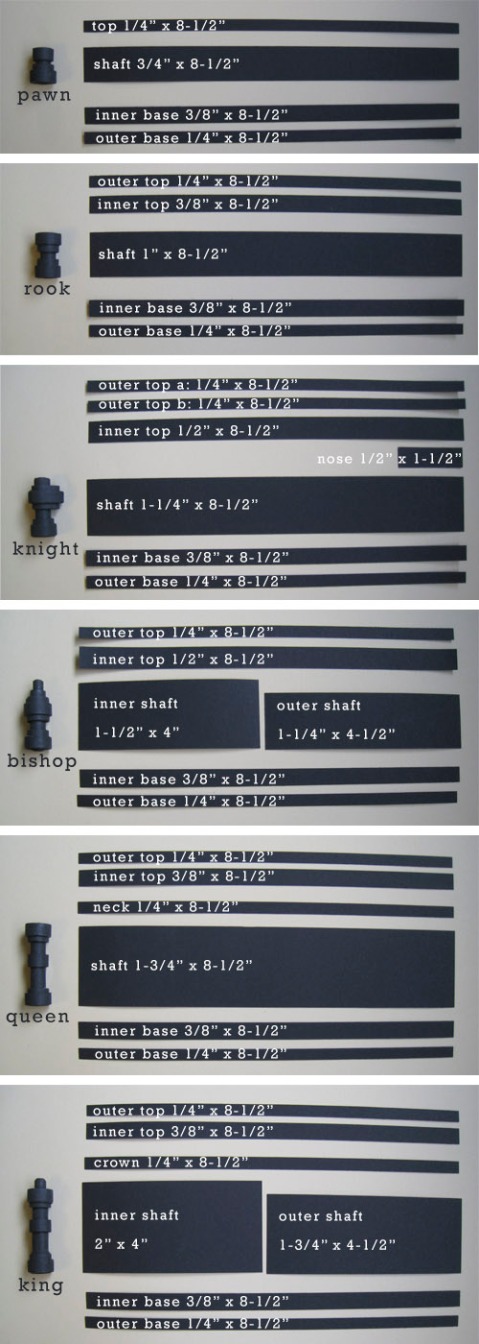
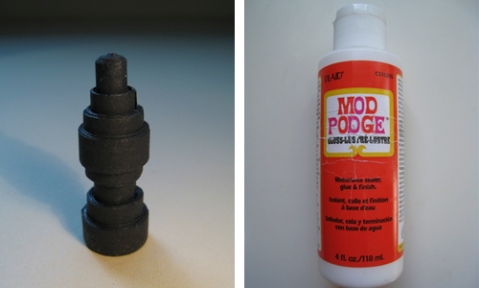
I am happy to give the specs if you are interested in undertaking this project. The pieces range from 3/4″ to 2″ in height. The board squares are 3/4″. The box is a portable 6-3/4″ square. I began each piece with the strip for the shaft, and moved outwards at the base and at the top. I generously applied glue to each strip using a glue stick before tightly rolling. I used very light cardstock — 65 lb stock is sufficient, any thicker would not roll well, and any thinner would take an eternity to build up. Do not forget to apply a sealant. I used Mod Podge with a gloss finish, though in hindsight wish I used matte. 


Jer, that is AMAZING! What a work of art!!! I’m sure the chess champ loved it.
Thanks, Juls!! It was a lot of fun to make. We already played a game, of course I stood no chance against him. 😛
WOW!!!
can there be anything else said? I am speechless Jer, this is beautiful.
Thanks, Karen!
I know you were very busy preparing for the Richmond Hill Studio Tour this weekend. I’d still love to blog about your own beautiful work!!! Christmas is coming!
[…] been on a roll with rolling paper since I made the paper chess set for O.T. last month. As meticulous an undertaking that was, I really enjoyed myself and […]
Exceptional. Takes my breathaway. If I start now, I think I’ll finish in time for Christmas. Again, exceptional work. Thanks
😀 He he. More than enough time. Thanks for peeking in!
This is AMAZING! I have a chess set that my grandmother made out of spools. That is great too, but this is AMAZING!
Hi Kim,
Your grandmother’s spool chess set sounds like a very unique concept!
Thanks for stopping by!
Hi! You are incredibly talented and creative!!!
I found your this utterly amazing, so i decided to make it for my friend.. but I have a few questions.. I’m having trouble with the knight, it doesn’t turn out the way yours is.. instead it looks sort of like a bishop with a really big head.. how do you get one side to look like a nose? Also, I am starting on the box and the board.. did you make the box or buy it as is? I’m going to curry’s to see if they can help me, but your help would be much appreciated!!!
Thanks so much!
Hi Jennifer,
So happy to know you’re going to make this one!!! 😀
As for the knight: the 1/2″ x 1-1/2″ strip that I labeled above as a nose — roll that separately so it’s a tiny little roll on its own. Then take that tiny roll (coiled side up like the rest of the pieces) and put it on the front of the shaft as you wrap it inside the inner top 1/2″ x 8-1/2″. Kinda like sandwiching in the tiny roll. That way, your knight will have a protrusion on the front and not look like a bishop.
As for the box, I made it out of chipboard. I made each piece of the box first, then covered each with black cardstock before putting the box together. You’ll notice I didn’t wrap the cardstock around the chipboard, I only glued cardstock on the surface and left the edges uncovered, and I like the look it gave. Then I stuck on the square pieces of cardstock for the board, and a monogram out of cardstock, and podged it all over.
Hope this can help you out a bit, let me know if I can help with anything else. 😀
Wow, this is such a wonderful idea and artwork, looks so nice! I did something similar to make a candlelightholder, if you want, you can look here

It’s so funny to do something with paper, love your chessgame so much!
I too am a lover of paper, but this? outstanding… !!! I just love it ..
This is absolutely marvelous. What a wonderful gift.
Very clever! And so cool that it could be made from recycled paper.
[…] no lo parezca están hechas de papel, ¿quieres saber cómo? Pues entra en el blog de Paper, Plate and Plane y descúbrelo, pero ya te adelantamos que se trata de tiras enrolladas y luego […]
I just found your instruction from a link on Dollar Store Crafts. The timing is perfect! My 14-year old son is big into chess and I am a paper bead artist. I recently bought an old 70’s style chunky wooden ottoman without the padding and am going to turn it into a chess table for him using tiles for the board. These pieces are perfect. Thank you so much for sharing this!
This is fantastic! I can think of several people I’d like to make it for. Thanks for sharing.
Thanks for stopping by! Glad you are going to make this one!
Looks like it took quite a while to make…but turned out beautiful!!! ❤
[…] If you are keen on trying this project out, see the full instructions on “Paper, Plate and Plane”. […]
[…] you are keen on trying this project out, see the full instructions on “Paper, Plate and Plane” by the inspirational Jeromina […]
Looks really beautiful..though I dont have your patience to build up the whole set, I am planning ot make a king and queen and gift it to my friend (chess buff) on his birthday…thank you so much
Oh my goodness!!! I want to try this project really bad! This would be a perfect gift for my 21 yr old son!! As soon as I have the money to go buy the cardstock I am soooo going to! I may end up asking a few questions as I go!
~Regi
This really neat and is going to make a great homeschool project for my kids! Do you have instructions or suggestions on how to make the box? Thanks for a great post!
Hi Matt,
I’m sorry for the super duper late reply! Glad you’re going to try this with your kids! I made the box out of chipboard. I cut each piece (i.e. front, back, and sides) of the box first, then covered the pieces with black cardstock before putting the box together. You’ll notice I didn’t wrap the cardstock around the chipboard, I only glued cardstock on the surface and left the edges uncovered, and I like the look it gave. Then I stuck on the square pieces of cardstock for the board, and a monogram out of cardstock, and podged it all over. Hope that helps! Let me know if you have other questions. I’ll try to answer sooner next time! 😀
[…] Tutorial and all images were found HERE!! This entry was posted in Uncategorized. Bookmark the permalink. ← DIY Mirror […]
[…] NINE: ROLLED PAPER CHESS SET […]
I love this! Can’t wait to make it for my chess loving 12 year old son, but I need to make an alteration- it needs to be magnetic- for traveling. Do you think I could add magnets to the bottom of each piece and use a sheet of lt metal for the box top/chess? Let me know what you think, Thanks!!
chess^board, oops!
One last question, how long did this take you? My son’s birthday is soon, but I could also wait until Christmas if I can’t fit it in. Am just wondering how much time, estimated, of course as we are at different skill levels, should I set aside?
Thanks again, I am so amazed as your craftiness!
Thanks for your generous information…my daughter and I made this for a school project and it was a big hit. I was so kind of you to post the pictures, dimensions and all the info!
I am working on this set for myself. I had a question about making the knights though. I know you put the nose on and wrap the inner top around it, but where do the outer top a and outer top b go? How did you figure out how far down to place the nose from the top of the piece?
Also how did you make the board itself? Did you just put the white squares over the black paper on the top or did you make both black and white squares and put them together in a grid?
Thank you so much for sharing this with us! I am sure the design planning took quite a while- sharing it with us was very generous. I made this chess set for my brother who collects chess boards, and I’m sure it will be different than any other that he has- your instructions in the post and in the comments were very helpful. I haven’t posted pictures yet since it is a surprise, but I linked back to your post from my DIY Guy Gifts Roundup:http://www.homesweethomebodies.net/2011/11/diy-guy-gifts-roundup-of-my-favorites.html
I’m really enjoying making this set. I’m working on the king and I’m having a bit of trouble figuring out how you put the crown on. Hints please!
OMG! This is gorgeous!!
[…] Rolled Paper Chess Set […]
[…] 17 year old Madison made this rolled paper chess set for her 16 year old brother for […]
[…] Craft Link : DIY Quilled Chess Set […]
Thank you for sharing. You did an Amazing job. I’m planning to start one set for my 15th year’s old Boy.
[…] he declared it, “Really Awesome,” which means I win at being an aunt. The tutorial is here for the pieces (you only need card stock and Modge Podge). I made the board in four pieces using […]
[…] students. I found this great idea on (guess where?) Pinterest that I thought I would tweak. This tutorial has directions on how to make a pretty awesome chess set with rolled paper! I thought that in […]
Love this… just a question. I’m starting with the shaft…but do I layer on top of shaft or glue to bottom or top parts???
[…] Rolled Paper Chess Set […]